Tutorial
Modeling With CSG
In BRL-CAD objects are constructed using a technique known as "Combinatorial Solid Geometry" or "Constructive Solid Geometry" or simply "CSG" In the CSG approach to modeling This technique involves creating objects by combining primitive shapes together to form complex objects. The primitive shapes are called "solids". Each one occupies a volume of three dimensional space. BRL-CAD currently has many primitive solid types. These include:
| Primitive Shape | BRL-CAD Name |
|---|---|
Arbitrary Convex Polyhedron |
arbn |
Arbitrary Convex Polyhedron |
arbn |
Arbitrary Convex Polyhedron (8pt or less) |
arb |
Extruded Bitmap |
ebm |
Elliptical Hyperboloid |
ehy |
Ellipsoid |
ell |
Elliptical Paraboloid |
epa |
Elliptical Torus |
eto |
Halfspace |
half |
Height-Field |
hf |
N-Manifold Geometry |
nmg |
Non-Uniform Rational B-spline |
nurb |
particle |
part |
polygonal object |
polygon |
pipe |
pipe |
Right Elliptical Cylinder |
rec |
Right Hyperbolic Cylinder |
rhc |
Right Parabolic Cylinder |
rpc |
Sphere |
sph |
Truncated General Cone |
tgc |
Torus |
tor |
Volume/Voxel |
vol |
* — Implementation known to be incomplete as of this writing
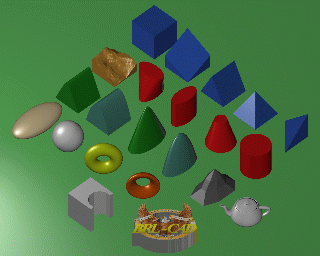
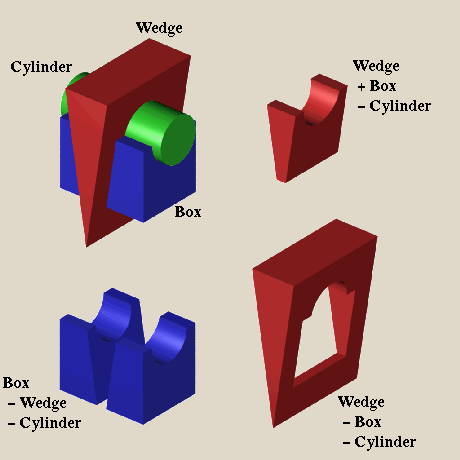
These primitives can be combined using boolean operators to create complex shapes. The three boolean operations supported are union, difference (or subtraction), and intersection. Any number of primitives may be combined to produce a shape. The union (u) of two solids is defined as the volume in either of the solids. The difference (-) of two solids is the volume of the first solid which is not in the volume of the second solid. The intersection (+) of two solids is the volume that is contained in both solids.
The result of performing a set of boolean operations is a new shape. In BRL-CAD this new shape is known as a "combination". This is frequently abbreviated as "comb". A "comb" can be further combined with other shapes to create still more complex shapes. For example, the shape of a simple cup might be created by subtracting a cylinder from a slightly larger cylinder. From this "comb" shape, the shape of a mug could be created by adding a handle. The handle might be composed of an elliptical torus with the part of the torus that would be inside the cup removed. Logically this is:
Cup = Outside - Inside
Handle = Ring - Outside
Mug = Cup union Handle
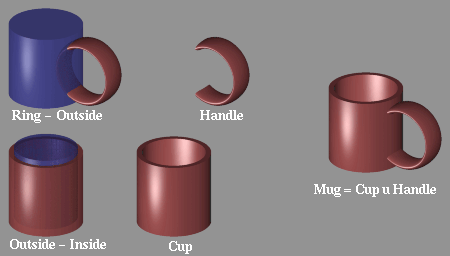
In this way the shape of objects are built up from components.
When the desired shape of an object is attained, a special combination called a "region" is created. A "region" represents an actual material component of the model. It represents an item which is made from a homogeneous type of material. In the example above two combinations are created: Cup and Handle. These two are brought together to form an object (Mug) which is made of a single material (such as ceramic or bone china). Material properties such as color, texture, transparency, reflectivity, etc. are assigned to regions.
The model is built up as a tree-like structure known as a Directed Acyclic Graph or DAG. It is permissible for a node to be referenced by different parts of the model. In the mug example, the solid "Outside" is a part of two different combinations: Cup and Handle. In this example the graph of the mug object looks like this:
			  Torus
			 /
		Handle (-)
	       /	 \
	Mug (u)		  Cylinder
	       \	 /
		Cup -- (-)
			 \
			  Insides
It is possible to refer to combinations and regions multiple times as well. For example, if a modeler were trying to create a cupboard containing three separate identical mugs, he might create a structure as follows:
	 Mug 1			    Ring
        /     \			   /
       /       \	 Handle (-)
     (u)        \       /	   \
Mugs (u)- Mug 2--Mug (u)	    Outside
     (u)        /       \	   /
       \       /	 Cup -- (-)
        \     /			   \
	 Mug 3			    Inside
Users familiar with other CAD software may prefer to think of the "region" as a "part". Combinations containing of "regions" may be thought of as "assemblies".
Starting MGED
The program for editing BRL-CAD geometry is called mged.
All the geometry for a particular model or application is generally
stored in a single file called a database. Each database may contain
many different objects. By convention, the files containing BRL-CAD
geometry have an extension of .g.
Before starting mged the user should assure that the X-Windows DISPLAY environment variable has been properly set. This indicates where applications should display the windows they create.
We use the following conventions for denoting text:
	Text typed by the user
	Text output by the program
To edit or create a geometry file, the user starts the mged program from the shell by giving the command:
% mged -c cup.g
The filename is required. Unlike many programs which allow the user to create a new document or database in memory, mged always keeps everything on disk. After each user command, the contents of the disk file are brought up to date. By doing this, the amount of work lost in the event of a system crash is minimized.
When mged is started, it prints out the release number and date of compilation. When multiple versions of mged are installed on a machine, this allows the user to verify that the proper version is being started.
If the file specified does not exist when mged is started, it will stop and ask if the user wishes to create a new database:
   % mged -c cup.g
   BRL-CAD Release 4.5   Graphics Editor (MGED)
       Mon May 19 16:31:32 EDT 1997, Compilation 5377
       bparker@vapor.arl.mil:/m/cad/.mged.6d

   cup.g: No such file or directory
   Create new database (y|n)[n]?
At this point pressing the "y" key followed by a return will create the new database. Any other (non-y) keys (followed by a return) will cause mged to quit without creating the database.
   % mged -c cup.g
   BRL-CAD Release 4.5   Graphics Editor (MGED)
       Mon May 19 16:31:32 EDT 1997, Compilation 5377
       bparker@vapor.arl.mil:/m/cad/.mged.6d

   cup.g: No such file or directory
   Create new database (y|n)[n]? y
   Creating new database "cup.g"
   Untitled MGED Database (units=mm)
   attach (nu|X|ogl|glx)[nu]?
At this point, mged is asking what type of geometry display window you would like. The default is always "nu" for Null or "no geometry display". If you are creating geometry, it is desirable to be able to see it. The common choices are:
| Name | Display Type |
|---|---|
X |
X Windows |
glx |
Iris gl under X Windows |
ogl |
OpenGL under X Windows |
Enter one of the names listed followed by a return.
   % mged -c cup.g
   BRL-CAD Release 4.5   Graphics Editor (MGED)
       Mon May 19 16:31:32 EDT 1997, Compilation 5377
       bparker@vapor.arl.mil:/m/cad/.mged.6d

   cup.g: No such file or directory
   Create new database (y|n)[n]? y
   Creating new database "cup.g"
   Untitled MGED Database (units=mm)
   attach (nu|X|ogl|glx)[nu]? ogl
   mged>
At this point you should have a window that looks something like this:
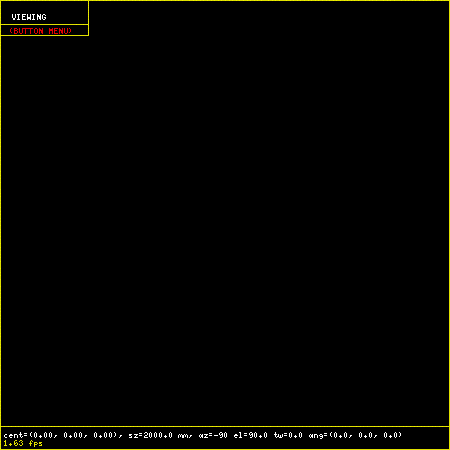
When the MGED program has a display window or device attached, it displays a border around the region of the screen being used along with some ancillary status information. Together, this information is termed the editor "faceplate".
In the upper left corner of the window is a small enclosed area which is used to display the current editor state. The current editor state indicates whether objects are selected for editing and what modeling operations are allowed.
Underneath the state display is a zone in which three "pop-up" menus may appear. The top menu is termed the "button menu," as it contains menu items which duplicate many functions which were originally available via an external button box peripheral. Having these frequently used functions available on a pop-up menu can greatly decrease the number of times that the user needs to remove his hand from the pointing device (either mouse or tablet puck) to reach for the buttons.
Below is an example of the faceplate and first level menu.
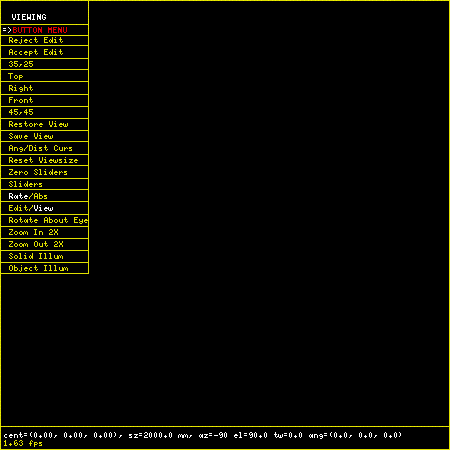
The second menu is used primarily for the various editing states, at which time it contains all the editing operations which are generic across all objects (scaling, rotation, and translation). The third menu contains selections for object-specific editing operations. The choices on these menus are detailed below.
Running across the entire bottom of the faceplate is a thin rectangular display area which holds two lines of text. The first line always contains a numeric display of the model-space coordinates of the center of the view and the current size of the viewing cube, both of which are displayed in the currently selected editing units. The first line also contains the current rotation rates.
The second line has several uses, depending on editor mode. In various editing states this second line will contain certain path selection information. When the angle/distance cursor function is activated, the second line will be used to display the current settings of the cursor.
All numeric interaction between the user and the editor are in terms of user-selected display units. The user may select from millimeters, centimeters, meters, inches, and feet, and the currently active display units are noted in the first display line. One important implementation detail is that all numeric values are stored in the database in millimeters. When MGED interacts with the user, it converts values from the database into the units selected by the user before displaying them. Likewise, values that the user enters are converted to millimeters before being written to the database.
The Screen Coordinate System
Objects drawn on the screen are clipped in X, Y, and Z, to the size indicated on the first status line. This creates a conceptual "viewing cube". Only objects inside this cube are visible. This feature allows objects within the cube to be seen, without cluttering the display with objects which are within view in X and Y, but quite far away in the Z direction. This is especially useful when the display is zoomed in on a small portion of the geometry. On some displays Z axis clipping can be selectively enabled and disabled as a viewing aid.
The MGED editor uses the standard right-handed screen coordinate system shown in the figure below.
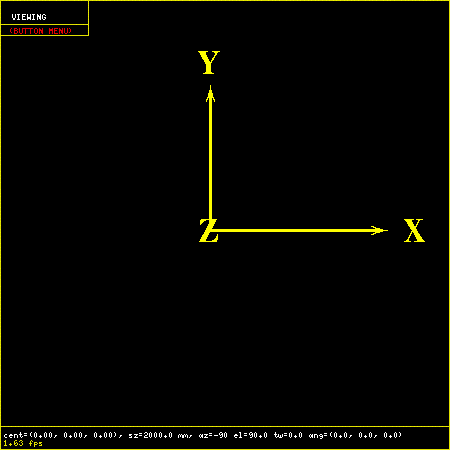
The Z axis is perpendicular to the screen and the positive Z direction is out of the screen towards the viewer. The directions of positive (+) and negative (-) axis rotations are also indicated. For these rotations, the "Right Hand Rule" applies: Point the thumb of the right hand along the direction of +X axis and the other fingers will describe the sense of positive rotation.
Creating Geometry: The Cup
Let’s look at the commands needed to build the cup geometry described in the first section. The following MGED editing session contains all the commands needed to create the mug. Each command will be explained below.
   % newmged Mug.g
   BRL-CAD Release 4.5   Graphics Editor (MGED)
       Tue May 20 10:33:44 EDT 1997, Compilation 5378
       jra@vapor.arl.mil:/m/cad/.mged.6d

   Mug.g: No such file or directory
   Create new database (y|n)[n]? y
   Creating new database "Mug.g"
   Untitled MGED Database (units=mm)
   attach (nu|X|ogl|glx)[nu]? ogl
   mged> title MGED Tutorial Geometry
   mged> units in
   New editing units = 'in'
   mged> in outside.s rcc
   Enter X, Y, Z of vertex: 0 0 0
   Enter X, Y, Z of height (H) vector: 0 0 3.5
   Enter radius: 1.75
   42 vectors in 0.006435 sec
   mged> in inside.s rcc 0 0 0.25 0 0 3.5 1.5
   42 vectors in 0.006435 sec
   mged> in ring.s eto 0 2.5 1.75 1 0 0
   Enter X, Y, Z, of vector C: .6 0 0
   Enter radius of revolution, r: 1.45
   Enter elliptical semi-minor axis, d: 0.2
   2479 vectors in 0.087375 sec
   mged> comb cup.c u outside.s - inside.s
   mged> comb handle.c u ring.s - outside.s
   mged> r mug.r u cup.c u handle.c
   Defaulting item number to 1002
   Creating region id=1001, air=0, los=100, GIFTmaterial=1
The first step in preparing a new database is to provide a title which describes the contents of the database. This is an important opportunity to describe the contents and purpose of the database. Setting the title is done with the title command in MGED.
mged> Title MGED Tutorial Geometry
When the database is first created, the default editing units are set to millimeters. For this example, we want to specify the dimensions of the object in inches. To arrange this, the units command
mged> units in
Now we can create our first solid. There are two techniques for creating geometry in MGED. The commands for these two techniques are make and in (for "insert"). For precision modeling the in command offers the greatest control over the definition of the solid. This is the approach we will use.
The "in" command can take all of its arguments on the command line, or it will prompt you for any missing portions. Remembering what parameters need to be specified for each solid can be difficult at best. All that you really need to enter is the command name. Mged will prompt you for the rest of the parameters.
In the first example above we specify the name of the solid we are creating ("outside.s") and the type of solid to create ("rcc"). Then mged prompts for the remaining arguments (vertex, height vector, and radius):
   mged> in outside.s rcc
   Enter X, Y, Z of vertex: 0 0 0
   Enter X, Y, Z of height (H) vector: 0 0 3.5
   Enter radius: 1.75
For the solid "inside.s" we specify all the parameters on the command line, so mged does not prompt us for additional arguments. In the case of the solid "ring.s" we specify some, but not all of the parameters, and mged prompts us for the missing ones:
   mged> in inside.s rcc 0 0 0.25 0 0 3.5 1.5
   42 vectors in 0.006435 sec
   mged> in ring.s eto 0 2.5 1.75 1 0 0
   Enter X, Y, Z, of vector C: .6 0 0
   Enter radius of revolution, r: 1.45
   Enter elliptical semi-minor axis, d: 0.2
   2479 vectors in 0.087375 sec
As a minimal example, if we wanted to create a sphere called "ball.s" we could simply type the "in" command and let mged prompt us for everything else:
   mged> in
   Enter name of solid: ball.s
   Enter solid type:  sph
   Enter X, Y, Z of vertex:  0 0 0
   Enter radius:  3
   51 vectors in 0.117187 sec
The three boolean operators supported are union, subtraction and intersection. These operations are denoted by the operators u, - and + respectively. Mged uses these in a sort of prefix notation. In this notation the union operator has higher precedence than either subtraction or intersection. Hence the following boolean sequence
	(A union B) subtract C

is written as

	u A - C u B - C
The comb command creates a boolean combination. In our example we use this to create the shape of the outside of the cup called "cup.s" Reading the command above that creates cup.c, we note that cup.c is formed from the union of the volume defined by the solid "outside.s" and the subtraction of the volume defined by the solid "inside.s".
The r command creates a "region". It is just like creating a combination, but the results are a volume of one logical material type.
Assigning material properties is done with the mater or shader command. Here we define which shader should be used when rendering the object, and the parameters for the shader. The simplest shader is the "plastic" shader which uses a Phong lighting model. For our mug this will be fine. We specify the plastic shader and set the color to a shade of green.
   mged> mater mug.r
   Shader =
   Shader?  ('del' to delete, CR to skip) plastic
   Color = (No color specified)
   Color R G B (0..255)? ('del' to delete, CR to skip) 32 128 32
   Inherit = 0:  lower nodes (towards leaves) override
   Inheritance (0|1)? (CR to skip) 0
The Inheritance option should be left 0. This option will be discussed later. Once we have created our geometry, it would be nice to look at the wireframe from a variety of angles. By clicking on the button menu box a set of options is displayed. The buttons labeled "35,25", "Top", "Right", "Front", and "45,45" offer a set of standard views.
It is possible to raytrace the current view from within mged. But to do so we need a place to display the image. We start up a framebuffer server (number 1) to accommodate this:
mged> exec fbserv 1 /dev/sgip &
This runs the "fbserv" program which will maintain a framebuffer window for us. Now we are ready to raytrace an image. First we’ll clear the geometry window of all the primitives and combinations and regions we’ve created. Then we display the region we want to raytrace with the "draw" command. Finally, we’ll select a nice viewing angle of azimuth 35 elevation 25 with the "ae" command.
   mged> Z
   mged> draw mug.r
   mged> ae 35 25
Now we are ready to raytrace an image. The "rt" command starts the raytracer on the geometry. We must tell it where we want the pixels displayed with the "-F" option, and the size of the image with the -s option:
mged> rt -F:1 -s 512
The rt program prints a variety of information when it runs:
rt -F:0 -s 512
rt -s50 -M -F:0 -s 512 cup.g mug.r
mged> BRL-CAD Release 4.4   Ray-Tracer
    Thu Jan  5 10:08:14 EST 1995, Compilation 1
    mike@wilson.arl.mil:/vld/src/brlcad/rt

db title:  MGED Tutorial Geometry
initial dynamic memory use=131072.
GETTREE: cpu = 0.001619 sec, elapsed = 0.004842 sec
    parent: 0.0user 0.0sys 0:00real 0% 0i+0d 2100maxrss 0+27pf 0+1csw
  children: 0.0user 0.0sys 0:00real 0% 0i+0d 0maxrss 0+0pf 0+0csw
Additional dynamic memory used=0. bytes

...................Frame     0...................
PREP: cpu = 0.001296 sec, elapsed = 0.003973 sec
    parent: 0.0user 0.0sys 0:00real 0% 0i+0d 2100maxrss 0+7pf 1+0csw
  children: 0.0user 0.0sys 0:00real 0% 0i+0d 0maxrss 0+0pf 0+0csw
Additional dynamic memory used=0. bytes
Tree: 3 solids in 1 regions
Model: X(-45,45), Y(-45,116), Z(-8,97)
View: 35 azimuth, 25 elevation off of front view
Orientation: 0.248097, 0.476591, 0.748097, 0.389435
Eye_pos: 87.6646, 90.5654, 97.5286
Size: 236.164mm
Grid: (0.461258, 0.461258) mm, (512, 512) pixels
Beam: radius=0.230629 mm, divergence=0 mm/1mm
Dynamic scanline buffering
Lighting: Ambient = 40%
  Implicit light 0: (155.394, -35.3438, 49.9036), aimed at (0, 0, -1)
  Implicit light 0: invisible, no shadows, 1000 lumens (83%), halfang=180

SHOT: cpu = 6.66068 sec, elapsed = 7.33342 sec
    parent: 6.6user 0.0sys 0:07real 91% 0i+0d 2100maxrss 0+20pf 0+251csw
  children: 0.0user 0.0sys 0:07real 0% 0i+0d 0maxrss 0+0pf 0+0csw
Additional dynamic memory used=0. bytes
154520 solid/ray intersections: 94456 hits + 60064 miss
pruned 61.1%:  151248 model RPP, 0 dups skipped, 50361 solid RPP
Frame     0:   262144 pixels in       6.66 sec =   39356.94 pixels/sec
Frame     0:   262144 rays   in       6.66 sec =   39356.94 rays/sec (RTFM)
Frame     0:   262144 rays   in       6.66 sec =   39356.94 rays/CPU_sec
Frame     0:   262144 rays   in       7.33 sec =   35746.50 rays/sec (wallclock)
If all goes well, you will get an image of a green mug on a black background.

Now let’s improve on our basic cup. The lip of this cup looks a little too squared off. To fix this, we’ll add a rounded top to the lip. To do this we create a circular torus solid positioned at exactly the top of the cup. Then we can add it to the combination "cup.c".
   mged> in rim.s tor 0 0 3.5 0 0 1 1.625 0.125
   214 vectors in 0.001814 sec
   mged> comb cup.c u rim.s
Now we have a unique condition. The solid rim.s was added to the list of objects being displayed when it was created. However, now it is also a part of mug.r (via cup.c). If we raytrace the current view we will have 2 copies of this solid. The raytracer will complain that they overlap. The best way to fix this is to clear the display, redisplay the new, complete object, and then raytrace. The "Z" command clears all objects from the display. Then we can redisplay the objects we want to raytrace with the "draw" command.
   mged> Z
   mged> draw mug.r
Since this is a frequent operation (clear the display list and draw something new) there is a shortcut:
mged> B mug.r
The "B" is not very easy to remember (one suggested mnemonic is "blast"), but it is quite useful. Now we are ready to raytrace again.
   mged> rt -F:1 -s 512
   rt -s50 -M -F:1 -s 512 mug.g mug.r
   BRL-CAD Release 4.4   Ray-Tracer
       Thu Jan  5 10:08:14 EST 1995, Compilation 1
       mike@wilson.arl.mil:/vld/src/brlcad/rt

   db title:  MGED Tutorial Geometry
   initial dynamic memory use=131072.
   GETTREE: cpu = 0.001785 sec, elapsed = 0.005385 sec
       parent: 0.0user 0.0sys 0:00real 0% 0i+0d 2152maxrss 0+31pf 0+1csw
     children: 0.0user 0.0sys 0:00real 0% 0i+0d 0maxrss 0+0pf 0+0csw
   Additional dynamic memory used=0. bytes

   ...................Frame     0...................
   PREP: cpu = 0.001468 sec, elapsed = 0.004084 sec
       parent: 0.0user 0.0sys 0:00real 0% 0i+0d 2152maxrss 0+7pf 1+0csw
     children: 0.0user 0.0sys 0:00real 0% 0i+0d 0maxrss 0+0pf 0+0csw
   Additional dynamic memory used=0. bytes
   Tree: 4 solids in 1 regions
   Model: X(-45,45), Y(-45,116), Z(-8,97)
   View: 35 azimuth, 25 elevation off of front view
   Orientation: 0.248097, 0.476591, 0.748097, 0.389435
   Eye_pos: 87.6646, 90.5654, 116.579
   Size: 236.164mm
   Grid: (0.461258, 0.461258) mm, (512, 512) pixels
   Beam: radius=0.230629 mm, divergence=0 mm/1mm
   Dynamic scanline buffering
   Lighting: Ambient = 40%
     Implicit light 0: (155.394, -35.3438, 49.9036), aimed at (0, 0, -1)
     Implicit light 0: invisible, no shadows, 1000 lumens (83%), halfang=180

   SHOT: cpu = 7.26825 sec, elapsed = 7.94901 sec
       parent: 7.2user 0.0sys 0:07real 92% 0i+0d 2152maxrss 0+22pf 1+270csw
     children: 0.0user 0.0sys 0:07real 0% 0i+0d 0maxrss 0+0pf 0+0csw
   Additional dynamic memory used=0. bytes
   170747 solid/ray intersections: 99501 hits + 71246 miss
   pruned 58.3%:  151252 model RPP, 0 dups skipped, 64892 solid RPP
   Frame     0:   262144 pixels in       7.27 sec =   36067.02 pixels/sec
   Frame     0:   262144 rays   in       7.27 sec =   36067.02 rays/sec (RTFM)
   Frame     0:   262144 rays   in       7.27 sec =   36067.02 rays/CPU_sec
   Frame     0:   262144 rays   in       7.95 sec =   32978.18 rays/sec (wallclock)
Editing Solids
So far we’ve focused on creating primitive solids and combinations. Now let’s look at ways of altering and deleting things that already exist. We’ll continue with our example mug geometry. There are a number of changes that need to be made to make it more realistic.
The handle for the mug is a little awkward. It sticks out too far from the side of the mug, and it is too wide.
The bottom is perfectly flat. Any imperfection in the table top would cause it to wobble. The inside bottom corner is too sharp. We need to create a "fillet" at the seam between side and bottom.
Fixing the Handle

 kill handle.c
kill ring.s
in handle_01.s eto 0 2.25 1.25 1 0 0 .75 0.3 0 0 .15
in handle_02.s rpp -.5 .5 1 3.5 1.25 2.5
in handle_03.s rec 0 3 1.25 0 0 1.25 0.3 0 0 0 .15 0
in handle_04.s eto 0 2.25 2.5 1 0 0 .75 0.3 0 0 .15
comb handle.c u handle_01.s - handle_02.s - outside.s u handle_04.s - handle_02.s - outside.s u handle_03.s

Adding a Base
 mvall outside.s outside_01.s
in outside_02.s tor 0 0 0 0 0 1 1.6875 .0625
comb cup.c u outside_02.s
in outside_03.s rcc 0 0 0 0 0 -.2 1.6875
comb cup.c u outside_03.s
in outside_04.s tor 0 0 -.2 0 0 1 1.6875 .1375
comb cup.c - outside_04.s
in outside_05.s ellg 0 0 -.2 1.5 0 0 0 1.5 0 0 0 .15
comb cup.c - outside_05.s
center 0 0 0
size 4
ae 170 -52 120
rt -s 512 -F :1

Adding a fillet
 mvall inside.s inside.c
mv inside.c inside_01.s
solid edit bottom of inside_01.s up to 0 0 0.3125
in inside_02.s tor 0 0 .3125 0 0 1 1.4375 0.0625
in inside_03.s rcc 0 0 0.25 0 0 0.125 1.4375
comb inside.c u inside_01.s u inside_02.s u inside_03.s
B mug.r
ae 35 85
size 5
rt -s 512 -F :1
