10. Creating a Mug
In this lesson, you will:
-
Create an outside cylinder using the in command.
-
Create an inside cylinder for hollowing out the larger shape cylinder.
-
Create a handle for your mug.
-
Create a combination to produce the body of your mug.
-
Create a combination to join the handle to the body.
-
Create a region of combined shapes with the same material and color.
In this lesson, you will be continuing your work creating real-life objects-in this case, the basic body shape of a coffee mug. In the next lesson, you will refine the body so that it is more realistic.
1. Creating a New Database
Create a new database and call it mug.g. Go back to the File menu and select Preferences, then Units, and then inches. This will create your body using inches.
| You could also do this by typing units in at the Command Window prompt. |
2. Creating the Outside Cylinder Using the In Command
To begin making the body, you will need to create an outside right
circular cylinder. At the MGED prompt, type:
in bodyout.s rcc
The diagram of this command is as follows:
| in | bodyout.s | rcc |
|---|---|---|
Make a shape |
Call it bodyout.s |
The shape type is right circular cylinder |
MGED will ask you the following questions about the cylinder
you want to make. Type in the values given in bold. Make sure you
leave spaces between variable values.
Enter X, Y, Z of vertex: 0 0 0 Enter
Enter X, Y, Z of height (H) vector: 0 0 3.5 Enter
Enter radius: 1.75 Enter
Note that the streamlined way to do this would be to type:
in bodyout.s rcc 0 0 0 0 0 3.5 1.75 Enter
The diagram of this command is as follows:
| in | bodyout.s | rcc | 0 0 0 | 0 0 3.5 | 1.75 |
|---|---|---|---|---|---|
Make a shape |
Call it bodyout.s |
The shape type is right circular cylinder |
The x, y, and z of vertex is 0 0 0 |
The x, y, and z of the height vector is 0 0 3.5 |
The radius is 1.75 |
A shape of a cylinder, in wireframe form, will appear in the Graphics Window.
3. Creating the Inside Cylinder
Using this same method, type in the information for the inside right circular cylinder. This cylinder will be used to hollow out the outside cylinder. Whenever you are creating a hole in the surface of an object, make sure the shape creating the hole protrudes through the surface. This will ensure that you don’t inadvertently leave a thin film of material where the two surfaces meet.
in bodyin.s rcc 0 0 0.25 0 0 3.5 1.5 Enter
The diagram of this command is:
| in | bodyin.s | rcc | 0 0 0.25 | 0 0 3.5 | 1.5 |
|---|---|---|---|---|---|
Make a shape |
Call it bodyin.s |
The shape type is right circular cylinder |
The x, y, and z of vertex is 0, 0, and 0.25 |
The x, y, and z of the height vector is 0, 0, and 3.5 |
The radius is 1.5 |
A second cylinder, inside the first cylinder, should now appear in the Graphics Window.
4. Creating the Handle
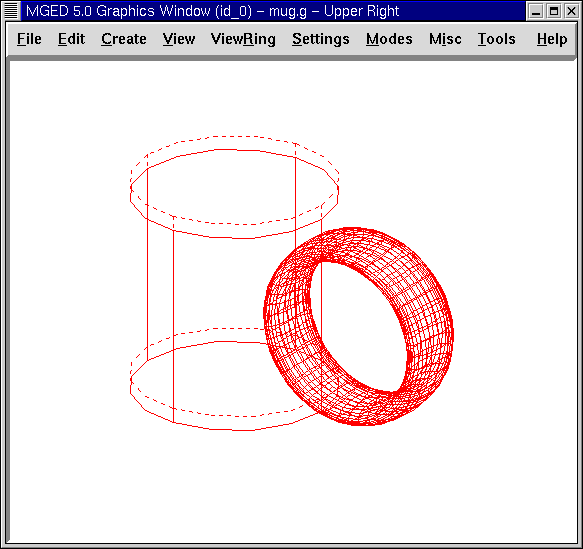
Now you will want to enter some information about the body’s handle. The shape type for the handle is an elliptical torus. At the Command Window prompt, type:
in handle.s eto 0 2.5 1.75 1 0 0 Enter
The diagram of this command is:
| in | handle.s | eto | 0 2.5 1.75 | 1 0 0 |
|---|---|---|---|---|
Make a shape |
Name it handle.s |
The shape type is elliptical torus |
The x, y, and z of the vertex is 0, 2.5, and 1.75 |
The x, y, and z of the normal vector is 1, 0, and 0 |
The program will ask you to enter more values for the elliptical torus you are creating. Type in the values shown in bold.
Enter radius of revolution, r: 1.45 Enter
Enter X, Y, Z, of vector C: 0.6 0 0 Enter
Enter elliptical semi-minor axis, d: 0.2 Enter
A doughnut shape should appear on the right-hand side of the body. If you look carefully, you can see that about one-third of the elliptical torus intersects the body.
5. Creating the Bodyout.s-Bodyin.s Combination
The next step is to combine the two cylinders into the body of the mug. To do this, type:
comb body.c u bodyout.s - bodyin.s Enter
You have told the program to make the combination body.c out of the union of bodyout.s minus bodyin.s.
| comb | body.c | u | bodyout.s | - | bodyin.s |
|---|---|---|---|---|---|
Make a combination |
Call it body.c |
Create a union of |
bodyout.s cylinder |
and subtract |
bodyin.s cylinder |
6. Creating the Handle.s - Bodyout.s Combination
To combine the handle with the outside cylinder, type:
comb handle.c u handle.s - bodyout.s Enter
| comb | handle.c | u | handle.s | - | bodyout.s |
|---|---|---|---|---|---|
Make a combination |
Call it handle.c |
Create a union of |
the handle.s torus |
and subtract |
the bodyout.s cylinder |
7. Creating the Region Mug.r
The last step, of this part of making the mug is to make a region out of your combinations. Type:
r mug.r u body.c u handle.c Enter
| r | mug.r | u | body.c | u | handle.c |
|---|---|---|---|---|---|
Make a region of shapes of the same material and color |
Call it mug.r |
Create a union of |
the body.c combination |
and merge it with |
the handle.c combination |
If you did this correctly, the program should say something similar to:
   Defaulting item number to 1002
   Creating region id=1001, air=0, GIFTmaterial=1, los=100
You should now have the region mug.r that is a combination of shapes containing the same material and color. You could assign color and material at this point, but you will want to do some more work on this design to make it more realistic. So, for now, review the lessons of this chapter. When you are ready to work again, you can continue refining your design in the next lesson.
8. Review
In this lesson you:
-
Created an outside cylinder using the in command.
-
Created an inside cylinder for hollowing out the larger shape cylinder.
-
Created a handle for your mug.
-
Created a combination to produce the body of your mug.
-
Created a combination to join the handle to the body.
-
Created a region of combined shapes with the same material and color.